This utililty has been tested on latest versions of Google Chrome (version 47), Firefox (version 43) and Internet Explorer (version 11) on Windows. The weight is on words latest and Windows. If you use anything else, then your mileage can vary.
This utility exists in two version. You can choose either or (both have 100% same code and functionality).
Everything runs locally within your web browser (even in offline mode), and no details of the stamps gauged are being sent outside your computer/device. Your privacy is valued.
Online version of this utility can be found at http://www.stampcollectingblog.com/free-digital-perforation-gauge/.
If you prefer to use the offline version:
1. Download the offline version here
2. Unzip the file anywhere you want (personally I keep this on desktop, but you can place it anywhere).
No need to install anything. Just unzip the files and you’re good to go.
3. Click on start.htm and you’re in business
This will open up your browser and from there on you’ll see all the required instruction on browser screen.
Note! If you use Internet Explorer, please do note that you have to "Allow blocked content" each time you launch the utility. Alternatively you can modify your browsers settings (Tools-> Internet Options->Advanced, scroll down to the Security section, and check Allow active content to run in files on My Computer).

Very likely your browser has updated to new version overnight, and during that process something has changed.
New versions of this utility will be made available periodically on Stamp Collecting Blog. These updates will not introduce new features, but they are released to fix bugs and increase stability / performance.
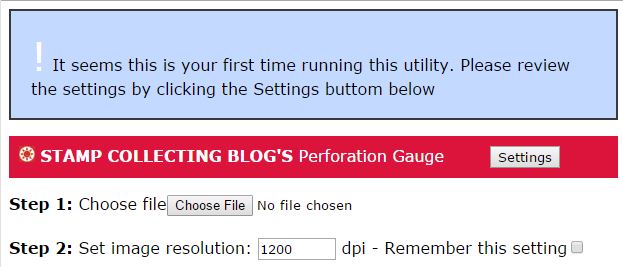
When you launch the utility for the first time, it ask you to review various settings:
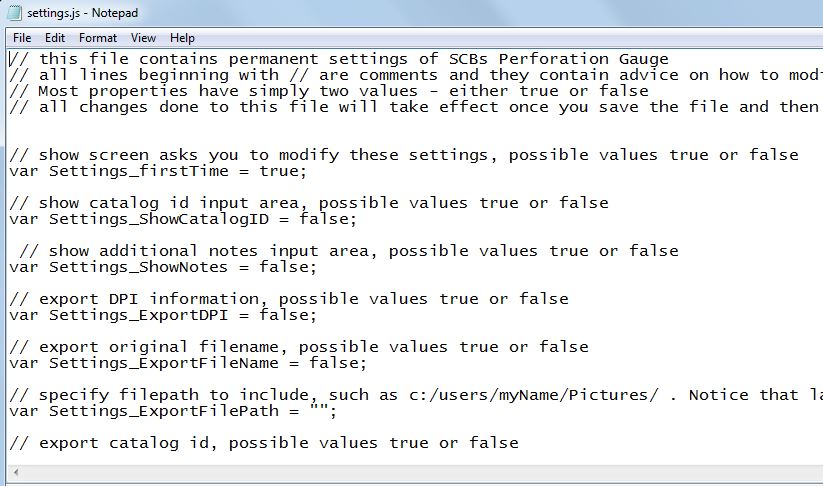
Note! If you use Internet Explorer, please do note that Internet Explorer DOES NOT SUPPORT this feature.
Instead you'll have to modify the values on file called "settings.js" in "utils"-folder.
Settings defined under Working enviroment section define what you see on your screen as well as how the utility behaves:
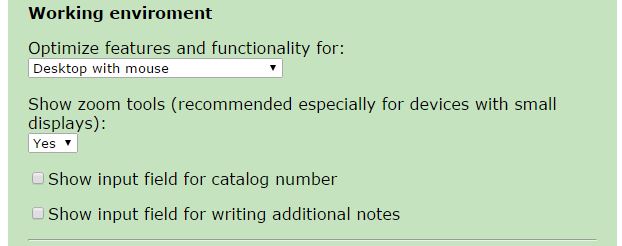
It is highly recommended that you set "Optimize features and functionality for: option to match your device type, as the utility behaves differently with different device types. Possible values are:
A practical example of differences between device types is making a selection. On "desktop with mouse" you make a selection simply by placing your (left) mouse button down, moving your mouse to specific directions and finally releasing the mouse. On "mobile or handheld with touch screen" you make a similar selection by defining the boundaries using single-taps (with your fingers) on desired locations in specific order.
By default the utility runs in so called 'autozoom' mode. In practice this means that if you try to view/gauge a stamp that does not fit within your browser window, then the utility will downsize the stamp image.
The Zoom tools enable you to vary the zoom (from 10-990%), as well as move horizontally and vertically.

This feature is not so necessary on desktops with large screens, but users on smaller screens (such as mobiles or tablets) need to use these controls frequently if they want to make accurate measurements.
If you like, you can enter and record additional information about each stamp. This can be done by enabling two options:
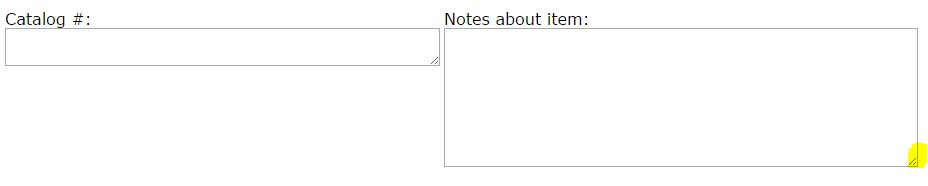
When these are enabled, they will show on your screen like this:

As the names of the fields suggest, the first one is reserved for entering catalog number, and the latter is for adding additional notes.
Both input fields are of unlimited size and you can 'expand' their size by dragging the fields on their bottom right corner:
You can include the following details into export reports:
By default only perforation data is selected for export.
This utility supports stamp images in resolutions between 96-20,000 dpi. I recommend at least 300-400 dpi, preferrably 1200 dpi (which is the default). You can easily change default dpi to anything by typing a new value in dpi-value field.
In order to get accurate results, you must know the dpi in which the image was taken. If you don't know the images dpi, but you do know the stamps exact physical dimension, you can still calculate the DPI manually using the following formula:
dpi = stamps width from image (in pixels) / stamps width in real life (in inch)
You can use any type of image file that your browser supports. The most likely supported formats/file extensions are jpg, gif, png and bmp.
You should try to scan the image so that it has at least some empty space on all sides. This is because the gauge markers and ruler are placed above the perforations, and if you don't leave at least some empty space they will show/fit properly on your screen.
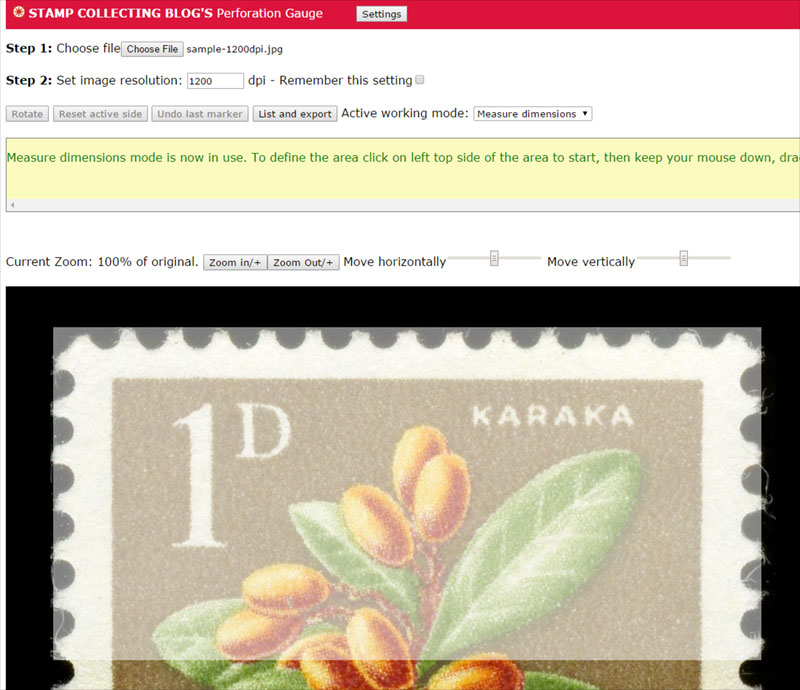
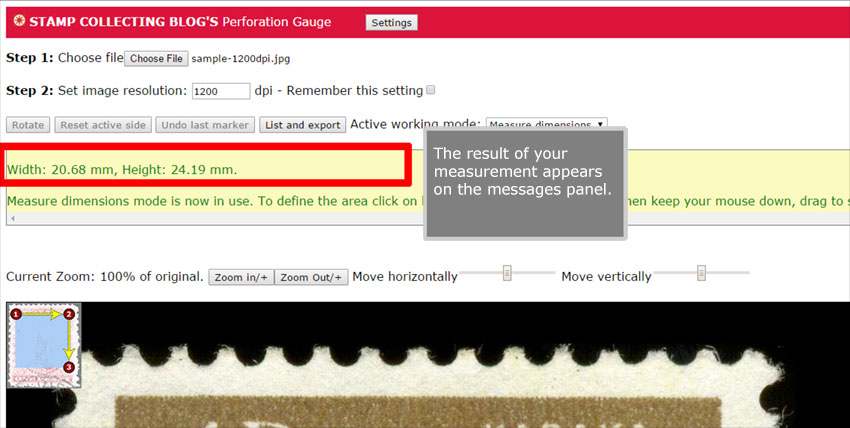
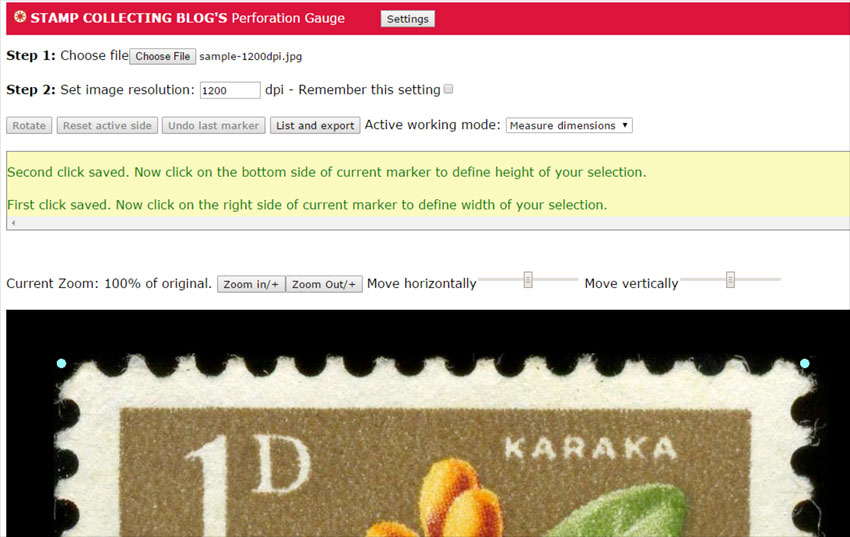
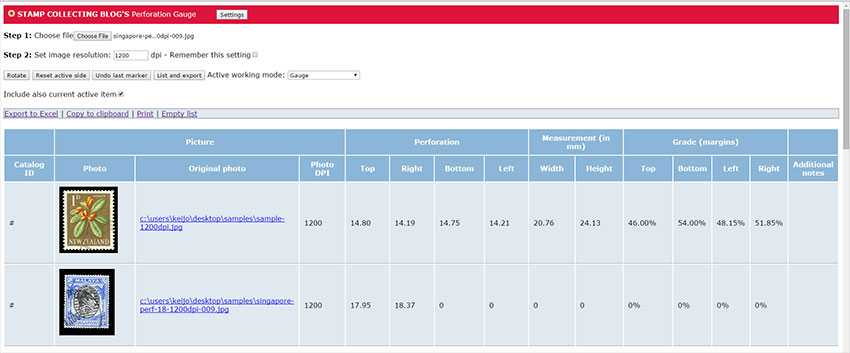
Click Choose file, and select the test image sample-1200dpi.jpg (on the same folder as everything else). Make sure that image resolution is set to 1200 dpi, and start gauging one side at a time.
If you end up with gauge similar to 'Top:14.8 Right:14.2 Bottom:14.8 Left:14.2', then everything seems to be functioning properly.
If your gauge readings are something very different, then there are three possibilities.
First, check that you set the resolution correctly (the sample image provided has resolution of 1200 dpi). Digital gauging requires that you know the resolution of the image precisely. If you select wrong resolution or the image has been up/downsized, then the gauging process will provide you false information.
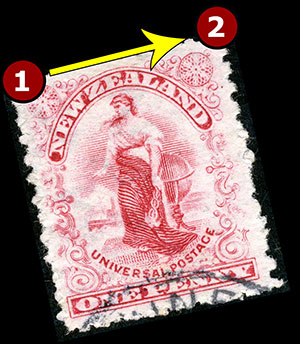
Second, because everything is based on your clicks and how accurately you place them, you might need to adjust your clicks. Try to click precisely on the center of perf-tip like this:
| Good | Bad | 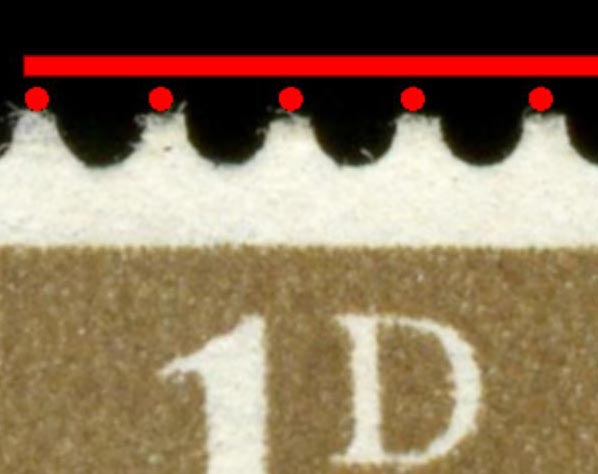 |
 |
|---|
If you have hard time placing your markers precisely, use the zoom tool whenever required.
Third option is that you've found a bug. In that case, please report it back to me preferably with some details of your device (what browser version, what screen resolution, what operating system) as well as what went wrong.
Click "Reset active side" button to clear all markers on the current side.
Click "Undo last marker" to clear just the last active marker.
In short, this utility is as precise as the clicks as you make.
If you put great care into placing the markers properly, then the results should not vary no more than 0.1 units. This equals a fraction of a millimeter in real world, I would consider 'accurate enough' for the needs of most stamp collectors.
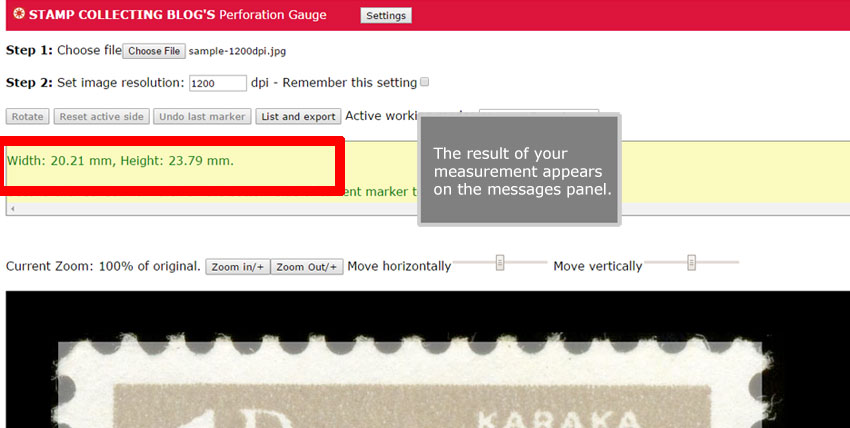
If you work on "Desktop with mouse" or "Mobile or handheld with pen" mode, then select the area to measure by doing as follows:
If you work on "Desktop with touch" or "Mobile or handheld with touch" mode, then select the area to measure by doing as follows:
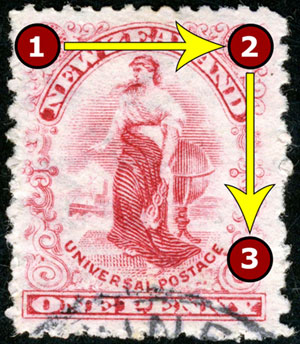
Grading works similar to measuring a stamp except that instead of 'measure' mode you must use 'grade mode', and instead of one selection you have to make two overlapping selections in two steps:
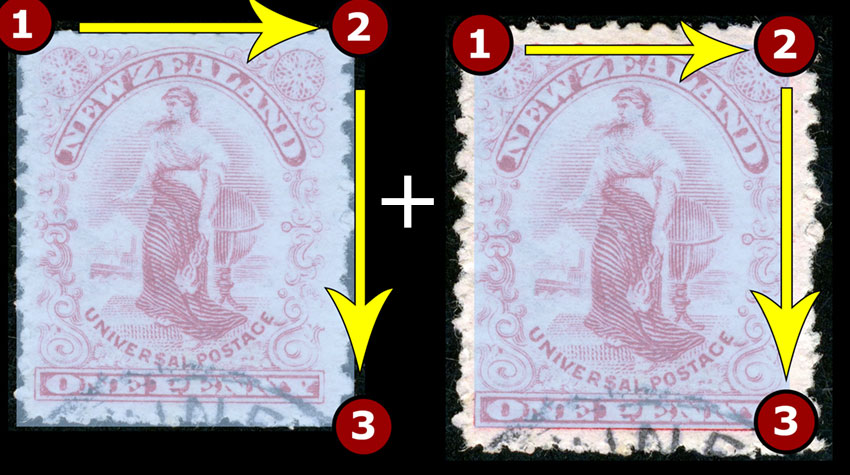
Step 1: Change Active Working Mode into 'Grade (centering)'
Step 2: Select the area of the stamp (including/excluding perf tips)
Step 3: Select the area of the stamps design
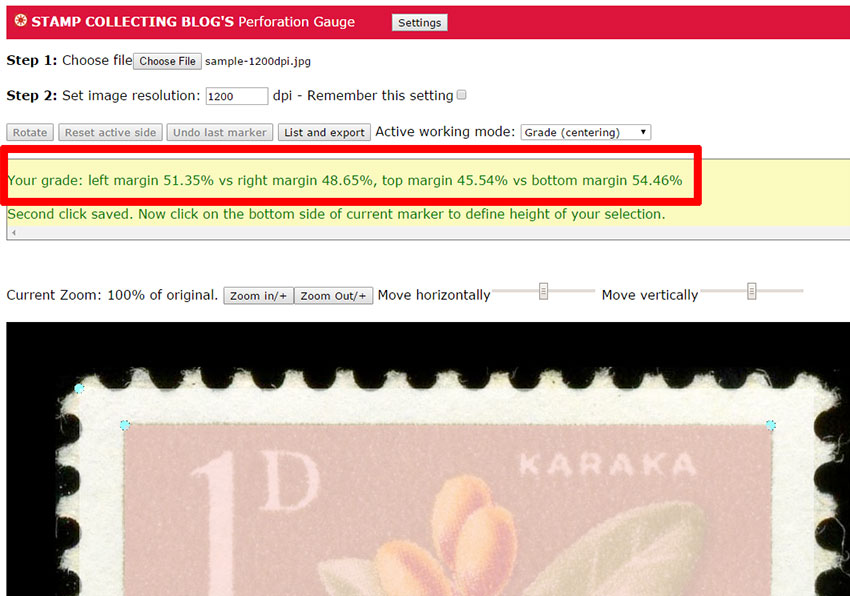
Once completed, the grade of the stamp is displayed on messages pane:
In order to use a straighten tool to as follows:
Step 1: Change Active Working Mode into 'Straighten'
Step 2: Do two mouse clicks (or taps with fingers) from left to right to define 'an invisible line' that will become the new horizon:
Once completed, the stamp will be rotated to proper position.
Depending on the browser and operating system used, the thumbnail image (used when exporting results) may or may not get updated to match the straightening operation. This is due to differences between browser security models.
By default the utility stores information about all the stamps you measure during the session. When you close your browser or move to some other page, this information is lost.
If you want to save the results permanently, you can do so by clicking the 'List and Export' button. This screen contains a number of options for exporting the data.
Export to Excel is either extremely quirky and sometimes downright broken piece of functionality depending on what browser you use and how unlucky you are. That said, I have still decided to include it 'as is' because when it works, it is one extremely powerful tool. Below is somewhat 'geeky' and lengthy explanation of the whys and wrongs.
Primary problem with this feature is that Microsoft Excel (and other similar spreadsheet programs) do not (yet) support embedded DataURI/Base64-images on HTML-content upon which this utility is based upon. So all efforts to copy or export thumbnail images will fall short and you'll get text only information exported.
To bypass the above issue, the utility converts the embedded DataURI/Base64-images into actual static (png) image files, and then tries to save them into your computer. In order to do so it has to receive your permission (in the end, you really do not want your browser to download / save stuff into your computer without your permission)
With Google Chrome this is simply a matter of giving permission when requested:

After that an Excel file AND thumbnail images are saved into your downloads folder. As long as you keep the images and Excel file together on the same folder, you can relocate them anywhere you like. And it works.
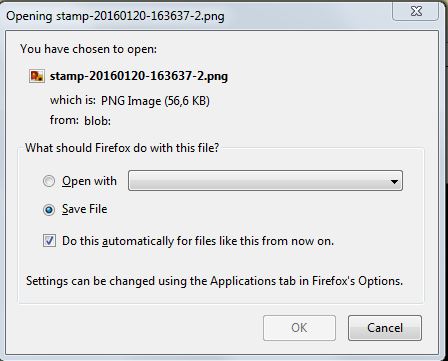
With Firefox it's more or less the same except that the approval proces is in two parts. You must give separate permission to Excel files and separate permission to images. The recommended setting is 'Save file' and 'Do this automatically for files like this from now on'.
With Internet Explorer it's once again a different story...Internet Explorer does not support multifile downloads, and as such the images are to be downloaded individually. Yes, it really does mean you have to give your consent to download each thumbnail image and Excel file. If you gauge just 10 stamps, you have to click 11 times. If you gauge 100 stamps, it's 101 clicks. Fortunately you can just keep your mouse where it is and just keep pressing it.
And finally, when opening up the generated Excel file you will be greeted with a warning "The file format and extension of stamps....xls don't match. The file could me corrupted or unsafe. Unless you trust it's source, don't open it. Do you want to open it anyway?". Choose yes, and the file opens normally... This warning is created by Excel Extension Hardening when it notices that the file contains HTML-formatted data (such as images)instead of Excel BIFF format. Again, this is something I have no power to change.

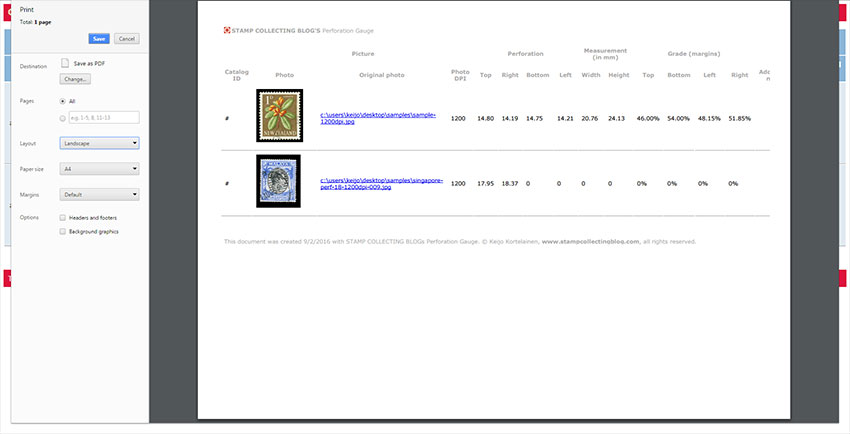
Exporting the results as PDF is very easy if you've got a virtual PDF-printer. Do as follows:
Step 1: Click the List and Export button
Step 2: Choose the Print link
Step 3: Choose your desired virtual printer (it can be PDF-printer, XPS-printer, or whatever you choose)
Step 1: Click the List and Export button
Step 2: Choose the Copy to Clipboard link
The information has been now copied on your clipboard.
This utility is build entirely using standard HTML5, CSS and JavaScript (with random hacks to make it cross-browser). It will not harm your computer in any way, but please be aware that gauging can be addictive and sitting extended periods in front of your computer may be harmful to ones health.
You are free to share copies of this free utility with your friends as long as you don't modify the contents or the code of this utility (with exception of settings.js and languages.js), or remove the copyrights.
All source code is copyright © of Keijo Kortelainen, Stamp Collecting Blog. All rights reserved.
The code on gauge.js is not crypted but minimized (into somewhat meaningless gibberish) to save space and enhance performance.
If you are a somewhat skilled developer, you can still read the code and maybe even understands good part of it. However, in such case, you will very likely build your own (hopefully improved) version of this utility instead of copying my source-code;)
Yes. In utils-folder there is a file called languages.js. Just modify the contents of this file to your needs in your favorite text/code editor.
In short no. I build this tool for my own/personal needs, and as such I'm not providing any official support for it.
That said, if you've got any issues or problems you can ask help at Stamp Collecting Blog or any other major stamp forum that I frequent. Depending on how busy (or not) I am, I may respond to your plea for help.
As a general guideline, make sure that :
I'm always open for suggestions, but please do understand that this tool has got all the features to satisfy my personal needs.
I may (or may not) add support for automatic perf recognition on some point (ie. just drop the stamp on the canvas, and it automatically measures perfs on all sides). But such a feature would require at least 80-100 working hours to complete, and that would be simply away from my family time.
But if you still feel you've got a SUPERB idea, feel free to get in touch